Let’s start with a quick question: Have you ever heard a fellow bowler say any of the following statements?
- “I just don’t like balls with balance holes. They don’t roll well for me.”
- “I’m going to have a weight hole put in the side so my ball will hook more.”
- “You only need a balance hole if your ball has too much side weight.”
These types of statements range from slightly misinformed to 100% wrong. Whenever I hear stuff like this, I know I’m talking to someone who really doesn’t understand how balance holes work. That’s OK, of course; no one person can possibly know everything about all topics. That’s why we’re here – reading, learning, and trying to become the best bowlers, ball drillers, and coaches we can be.
This article will attempt to provide a “crash course” in everything a bowler, pro shop operator, or coach needs to know about balance holes. I’ll start by discussing the current conventional thinking on balance holes, to provide the appropriate background for the remainder of the article. Next, I’ll show some “before and after” examples of what adding a balance hole can do to a ball’s motion. And, finally, I’ll give you my general thoughts on how you should think about balance holes so that you can more often understand what effect a given hole will have BEFORE you waste your time and money drilling it.
Disclaimer
I like to tell it like it is. So, before we get too far, I think it’s helpful to set some reasonable expectations. In general, balance holes are nothing more than a tool for fine-tuning ball motion. Unfortunately, you probably aren’t going to learn anything in this article that will add 20 pins to your average, give you 10 boards more hook, or make you carry the 10 pin 100% of the time.
However, learning about balance holes has very real and tangible benefits. A solid understanding of balance holes can help you get more out of your current arsenal. Balance hole knowledge can help you make better layout choices. And, proper use of balance holes can help you match up and have better ball motion a bit more often than you might otherwise. These are all good and valuable things, of course, but just keep in mind that a well-placed balance hole is never going to be a substitute for proper execution.
In the end, I hope you’ll walk away from this with not only a better understanding of balance holes themselves, but also with an improved understanding of layouts, ball dynamics, and ball motion in general. Let’s get started!
Conventional balance hole wisdom
In the beginning, balance holes (more commonly called “weight holes” back in those times) were used almost exclusively for the purpose of getting a drilled ball back to within the legal limits for static imbalance. Most commonly, a weight hole would be used to take a ball with too much side weight and get it back down to less than 1 ounce of side, which was and still is the maximum amount of side weight imbalance allowed by the then-ABC and the current USBC.
Sometime in the fairly recent past, ball drilling experts began to realize that a weight hole could also be used to manipulate a ball’s RGs and differentials. This opened up a world of possibilities for what could be done with a balance hole. The focus was shifted, and the purpose of a balance hole was no longer primarily to make a ball’s static weights legal. Balance holes began being used to significantly alter ball motion.
The most popular balance hole system or methodology in use today is the Gradient Line Balance Hole system, developed originally by Mo Pinel and his collaborators during his years owning and operating MoRich Enterprises. In short, this system defines four standard balance hole positions (P1, P2, P3, and P4) that can be used to alter the motion of the ball:
- P1 holes slightly weaken the ball’s motion by reducing its differentials and cutting down on its track flare.
- P2 holes have almost no effect.
- P3 holes moderately strengthen the ball’s motion by moderately increasing its differentials and moderately increasing its track flare.
- P4 holes significantly strengthen the ball’s motion by significantly increasing its differentials and significantly increasing its track flare.
Of course, prior to the development of the Gradient Line system, many of the more highly-skilled ball drillers already understood the basics of balance holes. They knew, for example, roughly where to put the extra hole to strengthen the reaction, and roughly where to put it to weaken the reaction. The Gradient Line system just gave a bit more structure to the process of picking a balance hole position. Instead of having an unlimited number of possible balance hole locations to pick from, ball drillers now had four standard positions, and each of them produced a certain outcome. All in all, the Gradient Line Balance Hole system was a big step forward, as it gave us a common vocabulary and framework from which to work. That’s a heck of a lot better than everything that came before it, and I would strongly recommend that all bowlers and ball drillers familiarize themselves with the basics of this system.
Balance hole examples
I’d like to walk through a few hypothetical scenarios to illustrate how various balance holes will affect a bowling ball’s on-lane motion.
As some of you know, I’ve spent an unreasonably large number of hours over the last five or six years studying the physics of bowling ball motion, culminating in the development of a software tool called Powerhouse Blueprint. In short, this piece of software is a bowling ball motion simulator. It implements a very complex set of equations that govern the motion of a drilled bowling ball, allowing for accurate studies such as this one that isolate the causes and effects of ball motion. It’s my tool of choice for demonstrating ball motion-related concepts, though I will admit to being a bit biased as one of its creators. All of the images and simulation data shown below were generated using a not-yet-released development version of Blueprint.
These examples all use a hypothetical symmetrical bowling ball with an RG of 2.54″ and a total differential of 0.041″. It will be “thrown” by a hypothetical bowler who has a ball speed of 18 mph, a rev rate of 300 RPM, 50 degrees of axis rotation, 10 degrees of tilt, and a positive axis point (PAP) of 4.5″ over and 0.5″ up. All of the simulations shown use the exact same oil pattern and all deliveries are thrown along the exact same target line. In other words, the only things that are changing from one example to the next are the layouts and balance holes.
Symmetrical ball, 50 x 5.5″ x 65 (layout A), no balance hole
In this first example, let’s start by drilling our ball with a fairly weak pin-down layout with Dual Angle parameters of 50 x 5.5″ x 65 (which we’ll refer to throughout as “layout A”). This ends up being a fairly low-flaring configuration, having a total track flare of about 2.7 inches.
50 x 5.5″ x 65, no balance hole
Below is a short video showing how this ball reacts on-lane. Note that in this video and all the others that follow, the same exact shot is shown three times in a row. Also, note that these videos are probably best viewed in full-screen mode, with the quality set to full 1080p HD mode.
As shown, this ball manages to get back up to the pocket, but it hits a bit light. Specifically, it gets up to board 16.15 at 60 feet, with an entry angle of 5.3 degrees.
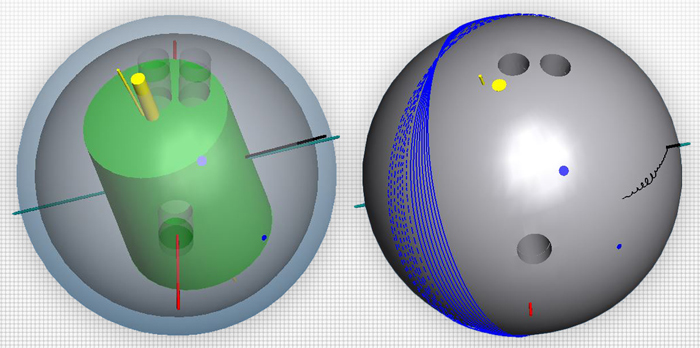
Symmetrical ball, 50 x 5.5″ x 65 (layout A), flare-decreasing balance hole
Now, let’s add a flare-decreasing balance hole to this ball. Specifically, this hole is 1 inch in diameter and 3 inches in depth, located slightly above the bowler’s PAP on the vertical axis line. In terms of the Gradient Line Balance Hole system, this hole is approximately in the P1 position.
50 x 5.5″ x 65, flare-decreasing balance hole
As the picture above shows, adding this balance hole does in fact cut down on the ball’s overall track flare, taking it from 2.7 inches of total flare before the addition of the hole to about 1.6 inches of total flare after. Let’s take a look at what that translates to in terms of ball motion:
Thanks primarily to the flare reduction, this ball hooks about two boards less than it did before adding the hole. It doesn’t quite make it back to the pocket and ends up on board 14.24 at 60 feet, with a lower entry angle of 4.5 degrees.
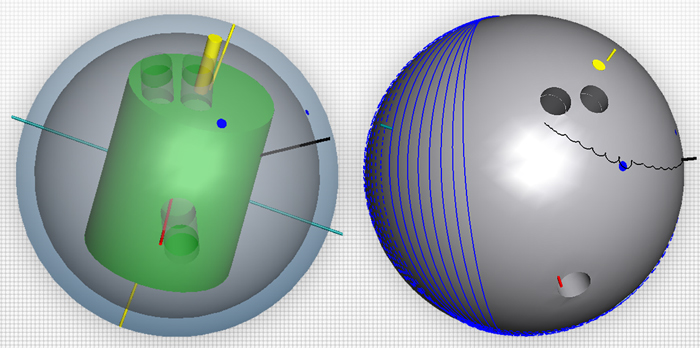
Symmetrical ball, 50 x 5.5″ x 65 (layout A), flare-increasing balance hole
Next, let’s look at how a flare-increasing hole affects this ball. This time, our balance hole is 1.125 inches in diameter and 3 inches in depth, with a location of about 2 inches to the right of the thumb hole. This hole position corresponds approximately to the P3 location in terms of the Gradient Line Balance Hole System.
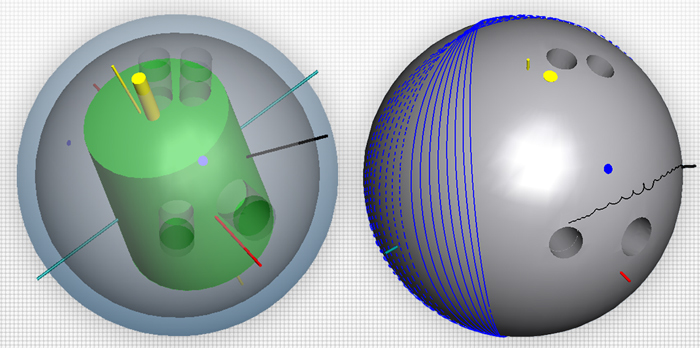
50 x 5.5″ x 65, flare-increasing balance hole
Once again, just as we expected, this flare-increasing balance hole caused our ball to flare quite a bit more than it did without the hole. Specifically, the addition of this hole increased our overall amount of track flare from 2.7 inches to 5.3 inches! If you expected that this would lead to an increase in total hook, you’d be correct:
Our ball now hits the pocket very high-flush, entering at the 17.9 board with an entry angle of 4.9 degrees.
So far so good, right? Let’s briefly summarize our results thus far. With layout A, our flare-reducing balance hole cut our total hook by about 2 boards, and our flare-increasing balance hole gave us almost 2 boards of extra hook.
Symmetrical ball, 60 x 4″ x 30 (layout B), no balance hole
Let’s shift gears now and repeat the above sequence of experiments, but this time using a much stronger layout. This pin-up layout (which we’ll refer to as “layout B”) measures in at 60 x 4″ x 30 and produces about 5.8 inches of total track flare.
60 x 4″ x 30, no balance hole
Just like before, let’s take a look at its on-lane motion. Again, nothing has changed from before except the layout:
As we might have expected, this ball out-hooks all three of our previous balls that used the much-weaker layout. It hits a bit high in the pocket, entering on the 18.8 board with an entry angle of 5.8 degrees.
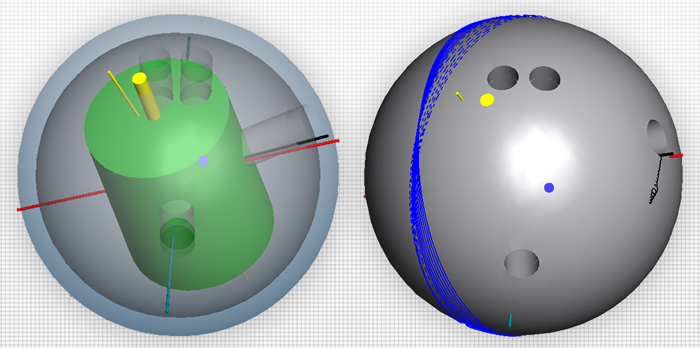
Symmetrical ball, 60 x 4″ x 30 (layout B), flare-decreasing balance hole
Just as before with layout A, let’s add the same flare-reducing balance hole:
60 x 4″ x 30, flare-decreasing balance hole
As expected, this balance hole cut down our track flare a bit, taking it from 5.8 inches down to 5.2 inches…
…and, in terms of on-lane motion, the addition of this flare-reducing hole caused a very slight decrease in total hook of about half a board. Specifically, this ball entered the pocket on the 18.3 board with an entry angle of 5.2 degrees.
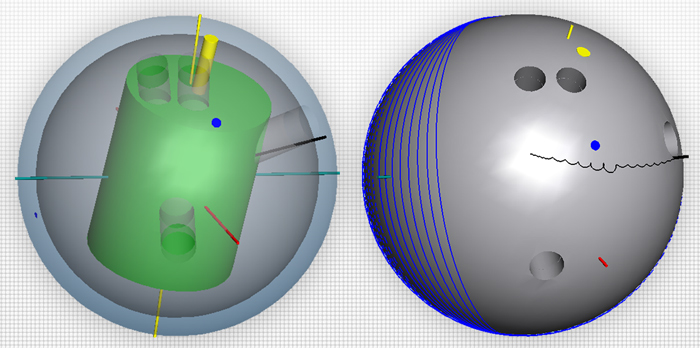
Symmetrical ball, 60 x 4″ x 30 (layout B), flare-increasing balance hole
Finally, we’ll add our flare-increasing balance hole to this ball, as shown below.

60 x 4″ x 30, flare-increasing balance hole
The addition of this hole does in fact increase our ball’s track flare, taking it from 5.8 inches up to 7.1 inches.
As the video shows, however, this increase in track flare did not translate into an increase in total hook. In fact, the addition of this hole reduced the total hook by 0.6 boards, with it entering the pocket on the 18.2 board with an entry angle of 5.1 degrees.
How can this be? The ball flared more, but it hooked a little bit less. What happened? Let’s dig a bit deeper.
Not all identical balance holes are created equal!
When we add a balance hole to a ball, several things are happening simultaneously:
- We’re reducing the weight of the ball by a small amount: This is insignificant and unimportant almost 100% of the time, so we’ll ignore it.
- We’re moving the ball’s center of gravity: This is the initial reason balance holes exist, after all, and it’s still true today that adding a balance hole to a ball changes its static imbalance.
- We’re changing the ball’s mass moments of inertia: In bowling parlance, we’re changing its RGs, its differentials, and the orientation of its minimum and maximum RG axes.
In our first set of examples above using layout A, we did the following:
- We took a low flaring ball and turned it into a very low flaring ball by adding the flare-reducing balance hole. This made the ball hook significantly less.
- We then took a low flaring ball and turned it into a high flaring ball by adding the flare-increasing balance hole. This made the ball hook significantly more.
With this layout, we were operating down at the low end of the track flare spectrum. In adding the two balance holes to this layout, the amount of track flare difference we saw caused large differences in ball motion. Going from a low flare situation to a medium flare situation causes the ball to experience significantly more friction at the back end when it exits the end of the oil pattern, due to the ball contacting the lane on a fresh dry contact patch a much higher percentage of the time as a result of the increased track flare.
In our second set of examples using layout B, we did the following:
- We took a high flaring ball and turned it into a slightly less high flaring ball by adding the flare-reducing balance hole. This made the ball hook just slightly less.
- We then took a high flaring ball and turned it into a very high flaring ball by adding the flare-increasing balance hole. This also made the ball hook just slightly less.
With this layout, we were operating at the very high end of the track flare spectrum. The change in friction experienced by the ball at this end of the spectrum is incredibly minimal. This is a bit of an exaggeration, but think of it this way: the ball without the balance hole was already contacting the lane on fresh dry surface 99% of the time. When we added the flare-increasing hole, we widened the flare rings slightly, but we’re at a point of extremely diminishing returns here. The slightly wider flare rings contribute nothing 99% of the time, because they were already fully separated. It’s true that there is an extremely minor friction increase each time the ball approaches the bowties; perhaps now we could say it is touching the lane on fresh dry surface 99.1% of the time instead of 99% of the time. But this, as you could probably imagine, has almost no effect at all on the ball’s motion.
So, we’ve solved part of the riddle. However, we haven’t answered why the layout B ball actually hooked a little bit less when we added the flare-increasing balance hole. The main reason is that the addition of this hole shifted the ball’s CG and changed its static imbalance. The CG position of the ball with the flare-increasing hole produced just slightly less hook than the CG position of the ball without the hole. The reason is that this shift in CG position made the ball lose axis rotation angle slightly faster than it did without the hole. The effect of this CG shift is fairly small – less than one board in total hook – but it is still an effect, nonetheless. And, since it wasn’t offset by a large friction increase, it became the dominant factor in what altered the motion of the ball in this example.
Suggested way to think about balance holes
Thinking about what a given balance hole will do to the dynamics of a bowling ball is a good and very reasonable first step. However, we shouldn’t stop there. Differentials affect track flare, and track flare can dramatically affect ball motion. So, differentials are just a means to an end. What we should really care about is how the addition of the balance hole will affect the ball’s motion.
The key point here is to understand that there is a very non-linear relationship between track flare and ball motion. In other words, an extra inch of track flare doesn’t always produce the same effect in terms of on-lane motion. Go from 1 inch of flare to 2 inches of flare and you’ll likely see a significant increase in total hook. Go from 6 inches of flare to 7 inches, however, and you probably won’t see any measurable difference at all in on-lane motion. When considering balance holes (and really, layouts in general), it’s important to think about where the ball will fall on the track flare scale both before and after adding the hole.
Consider the following, which shows a rough graphical approximation of how total track flare translates into ball motion:
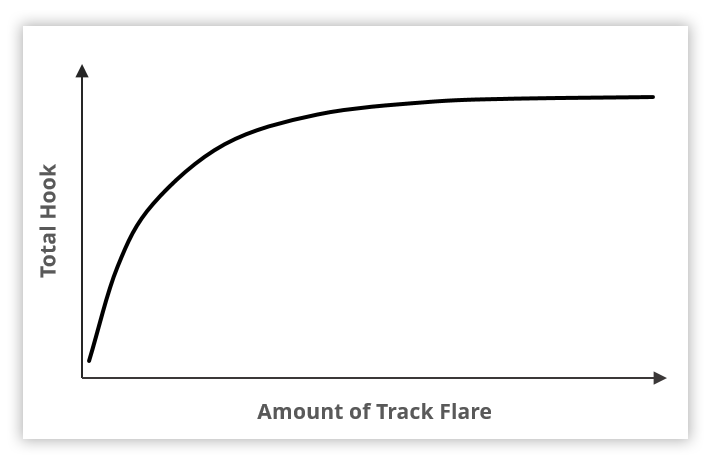
The relationship between track flare and total hook is very non-linear.
Here, we’ve labeled “total hook” on the vertical axis, but it could have just as appropriately been labeled “response to friction” or whatever other term you prefer that signifies strength. The point here is that it matters where your ball is on this curve if you’re thinking about trying to alter its motion with a balance hole. In our first set of examples (using layout A), our ball was over on the left side of the curve; small changes in flare in either direction resulted in significant changes in total hook. In our second set of examples (using layout B), our ball was over on the right side of the curve; small changes in flare in either direction had almost no effect on the ball’s total hook.
Conclusions
We’ve certainly covered a lot of ground here, but before we call it quits, I think it’s important to mention some small caveats:
- In this article, I’ve presented a framework for thinking about how traditional balance holes can affect ball motion, but it certainly isn’t 100% correct. After all, there are always outliers and exceptions. That said, the model presented is quite useful in the real world. We certainly could have had a much more complicated discussion on this topic, but that wasn’t the intent. The intent was to give you the 20% of information that gives you 80% of the results. The more complicated other 80% can be covered in a future article.
- We focused almost entirely on how track flare directly affects ball motion via its influence on the amount of friction the ball experiences. In doing so, we’ve taken a fairly simplified approach of looking only at total track flare (that is, we didn’t talk about finer details like flare in the oil vs. flare on the back end). Also, we didn’t talk about some of the other side effects of track flare that aren’t at all related to friction. Some of these details can be important in some situations, but we’ll leave these sorts of topics for future discussions. Again, the focus was to give you the 80/20 of how balance holes affect ball motion, so these finer details were left out intentionally.
- We looked at a very limited data set in this article. Basically, we covered two layouts, using one bowler, using one symmetrical bowling ball. We didn’t look at a wide variety of layouts, we didn’t cover lots of different bowler styles, and we didn’t look at multiple types of bowling balls (such as asymmetricals, for example). That said, the general concepts we discussed and the conclusions we reached should, in general, be fairly broadly applicable.
I hope you stuck with us and gained at least some appreciation for the importance of balance holes in modern bowling. Balance holes are just one of many tools that bowlers have at their disposal for fine-tuning their ball motion. Understanding how they contribute to ball motion can help you make better equipment decisions, which ultimately can make you a better bowler. And, if you happen to be a pro shop operator or coach, I really hope you learned some things here that will help you better serve your customers.
Finally, let me know what you thought of this article. Leave me a comment below and share your thoughts.