Over the next few months, I’m going to answer some questions I’ve been getting recently about how best to video. You can apply the principles here whether you are a coach filming a client or you just want a friend to help you capture your game for posterity.
A video camera can be a coach’s best friend. Both you and your athlete will learn a lot more a lot faster with it than without it. Here are just a few of the many wonderful things video can do for you:
- Improve your eye
- Confirm what you thought
- Teach you something new
- Provide documentation for progress
- Give instant feedback
- Provide an answer for those “I’m lost and don’t know what’s wrong” moments
- Accelerate progress using a visual tool from which most people learn very quickly
- Create a library of examples of everything you want to teach/avoid
- Provide greater coaching credibility
Sometimes you’ll have to get more than one shot from a certain view to be sure you have what you need. The more you video, the more proficient you will be at getting what you need in just one take. Here are some dos and don’ts to assure you won’t miss any of those stellar moments. I’ll be assuming a righthanded bowler.
Having a righty means your student will be on the even lane for the back and side views. You do not want anything between the ball side and you – the ball return, for example. That will cause you to miss important information. For the front view, you might want to move him to the odd lane so that you can be more comfortable as you stand on the channel cap. Moving him to the odd lane is not a requirement, but rather a safety/comfort thing for you. It is possible for you to walk in the ditch if you keep him on the even lane, although walking the channel cap is certainly easier.
Setting the scene
Here are a few things you’ll need to do to prepare for your video session. For example, how he dresses on camera day is important. A shirt with horizontal stripes or a solid shirt with a name on the back will allow you to clearly see the orientation of the torso in the stance. In addition, you can see if and when the tilting of the torso occurs. Light colored clothes will help you see the ball more clearly.
In order to better see the ball path and its rotation, place a piece of white tape on the ball from the PAP to just above the ring finger. The camera can easily pick up the white tape. I usually use ½ inch wide generic adhesive tape. (To quickly find the PAP, find the oil ring closest to the thumbhole. Place the ball on a table and get that ring parallel to the table with the holes above the line. The very top of the ball is the PAP).
I let my student warm up, usually six to seven shots. This is important, particularly in the first lesson. They are invariably nervous and those early shots are seldom representative of their true bowling self. So, let them thoroughly warm up before you begin to film. I take eight shots from three positions in a certain order. The order helps me minimize how much I have to move around and how often I have to adjust the camera settings.
I start with the views from behind the bowler and take a total of four shots from this position. I get one side view next and then three shots from the front.
Derriere view (sometimes called back view)
Both genders think their derrieres are too big! Be sure your student doesn’t have extra wide hips from this view because you’re using the wrong screen resolution on your wide screen laptop!
Start to record before he gets ready to make the shot. You want to capture the entire setup for the shot. There is a lot of information available to you if you start recording a couple of seconds before he initiates the shot and let it run for a couple of seconds afterward.
Here are the shots I take from behind the bowler.
- The whole approach and finish;
- A close-up of the release;
- A view (with the camera on the floor) of the release and the ball going down the lane;
- The footwork.
1. Approach and Finish
Let’s start with optimum positioning for the athlete, the camera, and the operator. You’ll want your righthanded student to be bowling on the even lane. Put his swing, rather than his body, in the middle of the viewfinder. Have a tiny bit of space above his head and a little of the approach beneath his feet visible. How far behind him you need to be to get this view will depend on the camera and zoom capabilities you have.
As he moves toward the line he’ll get smaller in the viewfinder. Be sure you have the camera positioned and focused in such a way that he doesn’t become a teeny tiny blip by the time he’s at the line and you can’t see what you need to see.
I usually find that when I upload this clip, there is more space around him than indicated in the viewfinder, which makes him smaller in the film than he needs to be. I’m not saying that if you cut off his head and feet they will appear in the footage, but you can often have slightly less space around him than the viewfinder indicates you need and still be okay.
2. Close-up of the release
I get very low, as you can see by the photo labeled “Release – Back View.” Before the shot, you’ll need to use the zoom feature and manually focus the camera on the channel cap. That will give you the proper depth of field. You will see the proximity of the ball to the ankle as well as the hand throughout the release process. Wait for him and the ball to arrive. If you have the camera too far back, by the time he gets to the foul line, his hand and the ball will be too small for you to tell very much. A practice shot here to check camera angle and focus would be advisable.
It’s difficult to get a good view of the release without a high resolution/high speed camera. The key thing you are looking for here is the position of the hand in relation to the ball and its equator in the moments just prior to and during delivery.
You can often tell what you need to know at a recording speed of 30 fps (frames per second) although 60, 500, or even 1000 fps is way better. There are 1000 fps cameras available. In fact there’s an app for that! Called SloPro, it works really well with your iOS devices. I’m not sure if it’s available for Android devices. The developer is Sand Mountain Studios.
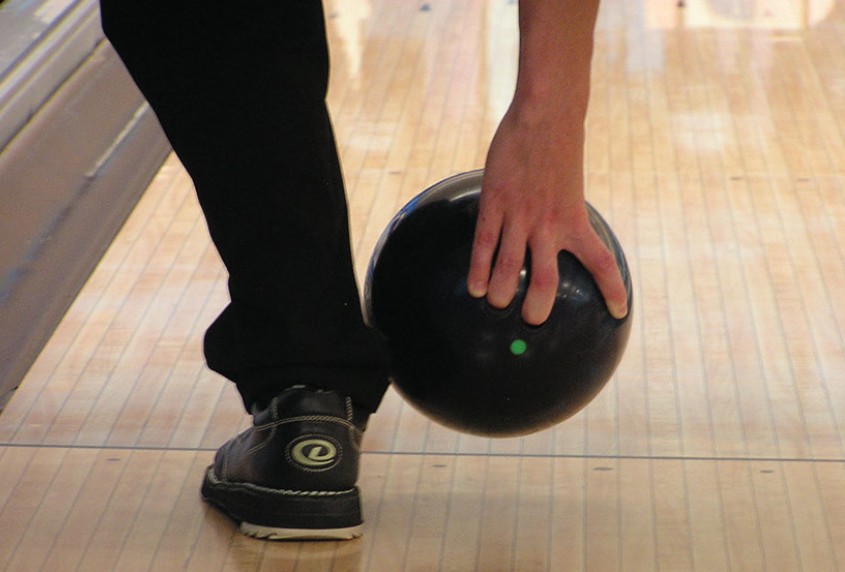
Release – Back View
3. The ball going down the lane
This view is a really interesting one. It shows the ball’s rotation and path as it traverses the lane. It’s the view you’ll use when discussing where the ball was at the target area, where the breakpoint was located, and the ball’s angle of entry into the pocket.
4. Footwork
Be sure and take a position that will allow the camera to see the steps all the way to the foul line. The position in the photo labeled “Footwork” would get the job done if you pan.The image labeled “Can’t See Much” is what will happen if you don’t pan the camera as they move forward. That shot may have had the feet in focus in the stance but the information is certainly lost at the foul line.
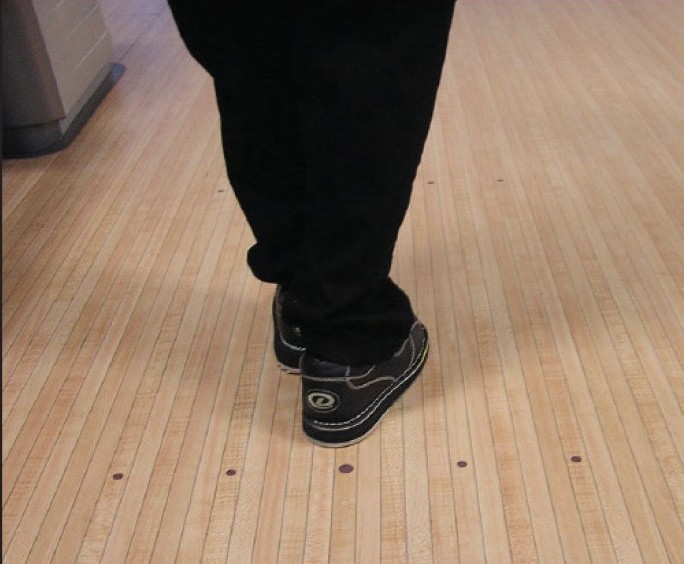
Footwork
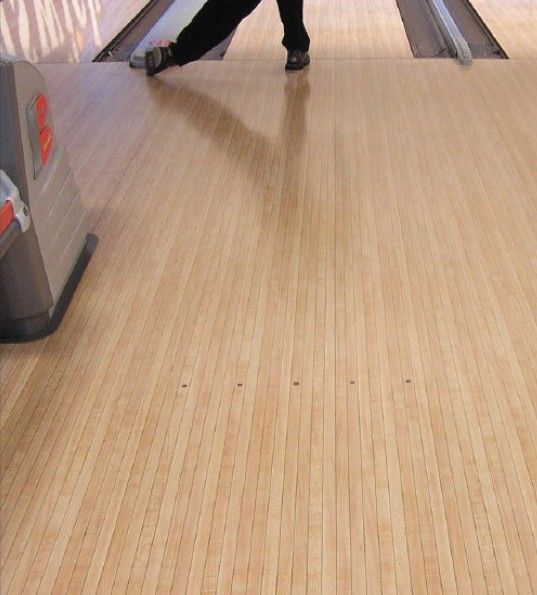
Can’t See Much!
Be sure you are consistent in this view. Actually, that’s true of all the views. Use the same positioning for everyone. If you don’t get that consistent view as you build your video library, comparing your student to models, examples, or even previous film of that student, won’t be very effective.
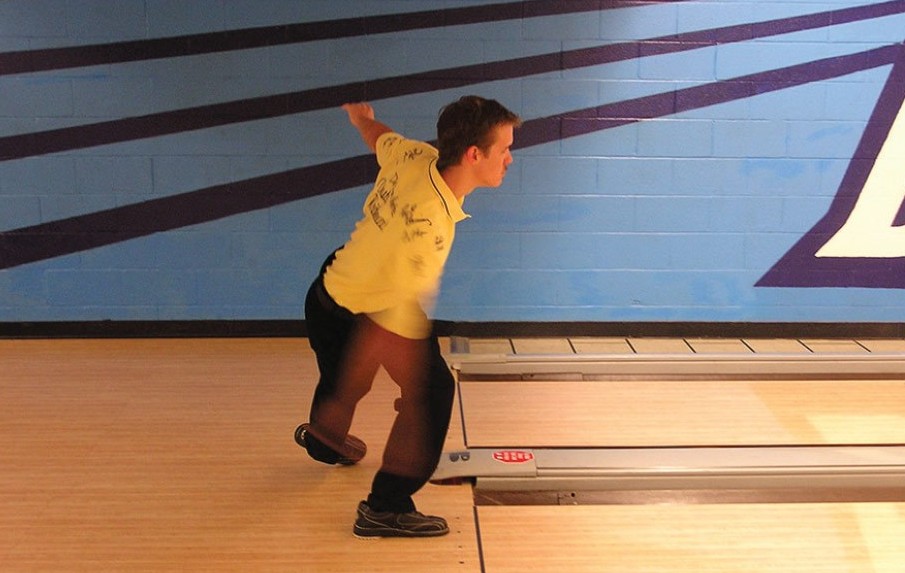
Swing side view
This is the view where timing is best seen. In addition to timing, you will also be checking the pushoff and backswing consistency as well as the torso/head orientation during the descent toward the foul line. You can check the finish position, posting the shot, follow through, and laydown point in this view as well.
There are two choices here. One is to get three lanes away at the back of the approach, filming him as he moves toward the line. The other view can be taken from the foul line a few lanes away. This seems to be a more universally used view and is the one I use most often.
I used to believe I should have the bowler in the left edge of the viewfinder and let him walk across the screen to avoid panning the camera so much. Not a good idea. Keeping the bowler in the middle of the viewfinder and panning is much the better choice.
Before you film, focus the camera on where he will be at the foul line. You might want to have him pose for you to be very sure you get the finish and all his body parts in proper focus. After a couple of times of this, you won’t need anyone to pose. Be sure all of his body, some space above his head, the approach under his feet, and the entire follow through will be in the center of the viewfinder.
In order to get a great shot from this view, you must focus first on his position at the foul line. Then get his starting position centered in the viewfinder. Begin to record before he gets into his stance so that you don’t miss anything. Follow him from start to finish, keeping him in the center of the viewfinder.
Don’t stop the video as soon as he lets go of the ball. It’s usually best to let the camera continue to run so that his demeanor can be captured as well. This will also help you identify both his pre-shot and post-shot routine – a key to refuge and consistency. If he does the same thing before every shot, great! If not, see what the differences are. This will be especially handy when he gets in a slump. And he will. We all do.
Occasionally, you might want to see the foot:ball relationship a little more closely from the side view. Use the zoom on your camera. Frame the bowler with about six feet of approach on one side and four feet of lane on the other. I say six feet of approach so that you can get the slide, or lack of, in the shot. Most people think they slide about six inches. It’s actually several feet. You want four feet or so of lane in the shot so you can determine laydown point. Hopefully, the ball touches the lane before it gets out of camera view!

Far, Far Away
Just Right
As he is about to start his approach, begin recording. You’ll be able to see his foot as it comes into the frame, sliding toward the line, when it stops, and when and where the ball passes his leg. You can see his hand position as he produces and completes his release as well as have a great view of his north-south laydown point.
Next time, I’ll discuss the front view as well as what hardware and software you’ll need.
Image Credits: Camera man image (©iStock.com/sculpies) is licensed for use by BTM and is the copyrighted property of its original creator.