It used to be so easy: there was dull and there was shiny. Dull balls were for oily lanes; shiny balls were for dry lanes. These days? Surface roughness is a key component to ball reaction and with the variety of conditions faced along with the increased rate of transition, managing that surface is vital to a bowler’s success.
Bowlers looking to improve their game often ignore the value of understanding surface management, so this month, that will be my focus. From the basics of what to use, to advanced techniques in the “grey area” of the rules, using the tricks of the pros can help anyone improve their game.
The basics of surface management
As stated earlier, the typical thought process is that sanded balls hook more and are designed for oil, while polished balls skid farther and are designed for drier conditions. While this is generally true from a lateral hook point of view (right-to-left or left-to-right), it is not necessarily true when looking at ball motion from front to back.
Sanded balls expend energy faster, transition from skid to roll more slowly and have a much smoother hook shape when compared to polished balls. The shinier a ball, the faster the transition from skid to roll, creating a more angular shape. This is a general rule that applies universally with regards to shape when comparing a single ball at two different surfaces. Exactly how much the ball hooks laterally is dependent on the lane conditions and bowler style.
Depending on conditions, sanded balls can actually hook less than polished ones because they lose too much energy too quickly. When considering a surface change, it is important to consider energy retention and hook shape first and lateral hook second.
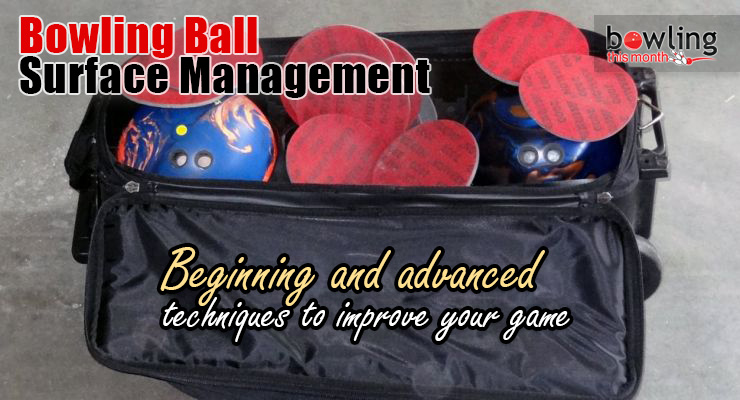
There are multiple types of abrasives and polishes on the market. For the purpose of this article, we will focus on abrasives, since they are most likely to be used by hand, before or during competition. In the abrasive category, Abralon and SiaAir pads are the most commonly used these days, but Scotch-Brite and sandpaper have been used a lot in the past as well.
Abrasive pads come in a variety of grits to allow bowlers control over the surface roughness. Most manufacturers these days provide information on their factory surface finishing process, but it is usually almost impossible to duplicate. This brings us to the first and most important lesson in surface management:
You do NOT need to keep a bowling ball at the surface roughness that it comes out of the box!
Manufacturers will produce bowling balls and set up the surface with the general public in mind. There is absolutely no reason to think that because the ball comes a certain way in the box that it is the “best” way for the ball’s surface to be for you. Your conditions, style, and ball layout could necessitate a surface change. Realistically, a ball’s reaction should be fine-tuned to the environment by surface changes; when you compete in different environments, you will need different surfaces. Abralon pads (and other abrasives) are what you use to fine-tune the reaction and match it up to your requirements.
Typically, you will want a full set of pads in order to give yourself maximum versatility. Like any abrasive, lower numbers indicate rougher surface and higher numbers are for smoother surfaces. 3000 and 4000 grit pads are very smooth and create more length than 500 and 800 grit pads.
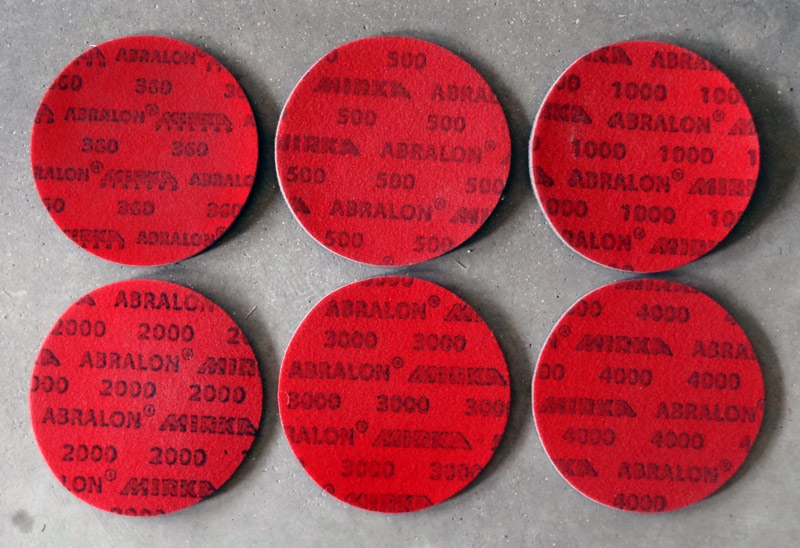
Serious competitive bowlers should always have a good selection of abrasive pads on hand at all times
The best way to get used to changing surface and to understand what effect the different pads have on your bowling equipment is to spend time during practice changing the surface multiple times. This brings us to our second important lesson in surface management:
Surface changes are reversible!
It is almost impossible to permanently screw up a bowling ball using surface changes. Anything you try can be undone or redone. The only consideration here is that if you use an extremely rough pad (anything under 500) you will need to do more work to take out those deep grit lines. That kind of surface roughness is harder to “undo” but is still an option for experimentation.
For example, if you start with a ball that has a 1000 grit sanded surface with polish on top and you choose to sand it to 2000 grit to see what happens, you can always re-sand the ball with a 1000 grit pad and then add polish back to the ball. Being unafraid to experiment is the best way to learn how to manage your surfaces.
Know the rules!
Before going into the techniques you can use for altering the ball’s surface, it is important to bring up a very important consideration: when am I allowed to alter surface? The answer to that question depends entirely on the nature of the competition in which you are competing.
USBC (American) and CTF (Canadian) Rule 18 can be found here, but below are the important points:
Altering the surface of a bowling ball by the use of abrasives while bowling in USBC/CTF competition is prohibited. All bowling balls so altered must be removed from the competition.
Competition is defined as the remainder of the current game and remaining game(s) in the series being bowled.
This is the general rule that applies to league play and tournaments where no specific rule regarding surface manipulation exists. It means you are only allowed to alter surface prior to the start of play (i.e. 3 game series, 6 game block, etc). Surface changes are allowed until before the first ball is thrown in competition (i.e. surface changes are generally allowed during practice).
However, different competitions can have different rules.
The Candian rule for tournament play is here, but the important part is below:
For tournaments with bowling ball restrictions (e.g. 6-ball limited events) bowling ball surface adjustments by hand are acceptable between games provided they are done in the designated area and that the adjustment procedure does not delay the bowler’s next turn.
This rule mirrors the rule for international competition where surface manipulation is allowed during the block, but only between games. It is a small but important distinction because you’ll often see bowlers touching up their ball surface between games in international play, but it is illegal in most local, state or national tournaments like the USBC Open Championships.
Incidentally, the USBC Open Championships has the strictest rule regarding surface manipulation:
No alterations of bowling balls are allowed once you leave the squad room.
This means that you aren’t even allowed to change ball surface during practice, prior to throwing your first ball for competition, which is allowed in league play or other “regular” competition.
This is just a small sample of the different rules that are out there when it comes to surface manipulation. Since the penalty can range from the ball being taken out of play, to 0 for the game, to disqualification, it’s extremely important that you confirm what rules apply to your situation. Despite the differences noted above, one thing remains constant: in no case are you allowed to alter the ball’s surface during the game.
Simple techniques
The most basic method of surface adjustment is to simply use an abrasive pad, in a small circular motion, around the whole ball. Provided that you use consistent pressure, this creates a uniform surface, similar to how a ball is prepped in the factory or by a Haus machine in the pro shop. Even including the more advanced techniques below, this is the most common method of surface adjustment by hand and it is extremely effective. If all you do is master this technique and understand the effects that different pads have on your equipment, your game will improve significantly.
An important consideration when using this method is not simply the final pad you use, but the underlying surface. A ball that is sanded with a 500 pad and then a 3000 pad will have a slightly different reaction than a ball sanded with 1000, then 2000, then 3000. Sometimes, the correct surface adjustment requires more than simply touching the surface with a single pad. Note that this is also true when applying polish. A ball sanded with 500 then polished will not be the same as a ball sanded at 4000 then polished.
A more advanced way to look at ball surface adjustments is to understand the effects of the direction of the sanding lines on the ball. The same pad, used either with or against the bowler’s ball track can also impact the ball shape. Sanding the ball in the same direction as the initial track will create a ‘grain’ of the ball that typically creates more length than a ball sanded perpendicular to the initial track.
This is more similar to what can happen when a bowling ball is sanded in a ball spinner. Depending on the ball’s orientation in the spinner, the grit lines created by the pad can be with or across the track. Higher rev players often prefer sanding with the track, while bowlers looking to get the ball started sooner will tend to gravitate towards sanding against the track.
When discussing the direction of the sanding lines, it is important here to consider the ball’s track flare. A ball that is sanded with the initial ball track that has a lot of flare will see the sand lines start to become more perpendicular to the track as it flares. Lower flaring balls don’t see that kind of change because the axis does not migrate as much.
These are the most commonly used techniques for adjusting surface, and the vast majority of the time, these techniques allow bowlers plenty of control over their ball reaction. Using these techniques at the appropriate time will never get you in trouble with a tournament director or rules committee. Mastering surface manipulation through these different methods will give bowlers a much better chance at creating good ball reaction across a variety of conditions.
There is, however, a more advanced method of looking at surface management, and it is one that borders on illegal depending on the interpretation of the rules.
Advanced techniques
This is where you really need to know your rules. The following techniques constitute the “grey area” of surface manipulation. Some organizations have rules that are very clear about surface texture being “uniform” around the entire ball, like the PBA’s:
If the surface friction of the ball is altered by sanding or polishing, the entire surface of the ball must be sanded or polished in a uniform manner.
The USBC’s general playing rule is not written so clearly, but they are clear in the FAQ section that surface changes must be uniform as well.
However, the understanding and application of this rule is difficult. On one hand, altering just a portion of the ball with a rougher pad is clearly illegal. This means that you can’t simply sand a portion of the ball at 500 grit, then sand the rest of the ball with 3000 grit. On the other hand, when sanding by hand, it is very hard to be absolutely consistent in the pressure being used, and even more difficult for an observer to know what kind of pressure is being used, so the rule is very hard to accurately enforce.
Therefore, using the same pad around the whole ball, but with various amounts of pressure or directions is a generally accepted practice among international coaches and professional players. Almost all coaches have used this kind of “grey area” to their advantage in improving ball reaction. As long as the entire ball is sanded, it is very normal to see bowlers and coaches “hitting the flares.”
“Hitting the flares” consists of trying to create more friction in a certain part of the lane, most often the midlane or back end. To do this, those who use this practice will locate the flare section of the ball they’d like to “hit” and sand perpendicular to these flares, then sand around the rest of the ball in a general manner, all with a single pad.
This is not a recommended practice by any means. Whenever you skirt the rules or simply push the rules to their limits, you risk some serious penalties. Even PBA and international players do so at their own risk. That said, understanding how very small aspects of surface manipulation can improve your ball reaction can only help further underline the importance of playing with ball surface.
Practice makes perfect
The best thing for any bowler to do is to invest in some abrasive pads and spend some practice sessions playing with them and adjusting ball surface back and forth. Just like you can spend time working on your swing or footwork, improving your surface preparation knowledge can be a valuable step to improving your game.