
It is an amazing time to be a bowler. New high-tech bowling balls are introduced each month. Bowling shoes with interchangeable soles and heels are commonplace. Everywhere you look you see mobile devices. While many bowlers use them to check email, update Facebook, tweet, text, or play games, these gadgets are capable of more – a lot more.
Because there is so much going on, this look at technology will be split into several articles. This article will focus on video recording, editing, and playback. Let’s take a look at the amazing and useful things you can do with the latest devices.
“Any sufficiently advanced technology is indistinguishable from magic.”
—Arthur C. Clarke
Mobile devices come in two common formats: smartphones and tablets. Tablets have larger screens but fewer sensors and communication capabilities. Smartphones are smaller and more focused on being, well, a phone.
Both types of devices have a lot in common. They have megapixel cameras that can take pictures and video. They have gigabytes of storage and some are extendable by adding an SD or microSD card. They are also all obviously battery powered which allows them to be used practically anywhere for hours at a time.
These devices are really miniature computers that run capable operating systems. Two of the most prevalent operating systems are iOS and Android. Apple devices exclusively run iOS and include all the iPhone versions and the various iPad tablets. Popular Android smartphones are made by Samsung, HTC, LG, and Motorola. Popular Android tablets are made by Samsung, Google, Sony, HP, ASUS, and a host of others too numerous to list here.
The Windows 8-based smartphones and tablets being made by Microsoft and Nokia are just now becoming common in the marketplace and won’t be evaluated for this article. This will be something to look forward to in the future.
As with PCs or mobile devices, there is often an “I love one and hate the others” polarization with respect to operating systems. As a software developer, (yes, that’s my major distraction from coaching and bowling), I would describe operating systems as different, large competing countries that have their own languages, governments, and laws. If you want to work in that country, then you need a “passport” and you have to conform to the local customs and regulations if you want to get anything done efficiently. In other words, they are all annoying at times and helpful at times and one usually feels more like “home.”
Like it or not, technology is rapidly evolving and, just as with bowling balls, new options become available constantly. Keeping up is sometimes exciting and sometimes painful. When describing mobile devices in these articles there will be two sets of distinctions: what operating system is used tablet or smartphone.
Apps that run on devices are specific to that device’s operating system. It takes significant effort to create an application and supporting multiple operating systems can be costly due to the specialized hardware and the different software skill sets needed during development and testing. Minimizing costs means that many apps are only available on a particular operating system. I hope you will read the entire article as I have included tips throughout that can be used regardless of your operating system or device choice.
The reason for denoting smartphones or tablets is primarily due to the screen size. Some apps and external hardware such as tripod mounts are specifically made only for smartphones and others only for tablets. A housekeeping note – many companies, products, and technologies are mentioned in this article. Their names are the sole property of their respective owners and trademarked and copyrighted, etc.
Video
One of the most exciting new features of the latest mobile devices is high definition video recording. Gold Coach Susie Minshew recently had a series of articles in Bowling This Month on creating videos. These are an excellent source of material on what and how to video yourself or someone else while bowling.
In this article more focus will be on how the devices capture, display, and annotate video. I will add a few tips to help you avoid the mistakes I made while making test recordings.
Tip: Since you can easily delete and create new videos and images, feel free to experiment to see what you like and what works well. This will also help you get familiar working with the various video apps.
Have a mount and a tripod for your devices for best results when recording video. You can, of course, have someone hold your device and record video using a camera or video app. This is handy for a quick peek or to capture a special moment like the 10th frame in a 300 or 800 attempt. However, for better video, it’s helpful to have a stationary view.
Note that you can get six inch or so tall tripods from Amazon and, while these are extremely affordable at $3 to $10, they are not very rugged and don’t last long, especially if you store them in a bowling bag. Hint: Bowling balls crush plastic stuff. I know from firsthand experience.
If you’d like a tripod and mount specifically for your mobile device, you have lots of options. For this article, I selected a mount and tripod from www.iStablizer.com for $29.95, shipping included. Many other options exist that are either a bit less or a lot more.
If you already have a tripod, you can get a mount only for $20 or less depending on how rugged and fancy you want it to be. Going into all the choices would be an article in itself. Look at what is shown here and feel free to scour the web. The search is sometimes half the fun.
iStabilizer tripod and mount
Here are the key features of the iStabilizer products:
- Mounts available for smartphones and tablets
- Mounts fit standard tripod
- Flexible tripod easy to adjust
- A Bluetooth shutter trigger is available for iOS
The iStabilizer tripod is roughly one foot tall and I purchased a separate mount for tablets seven to ten inches in length. You can get a smartphone mount instead by purchasing a different model. The tripod legs are very flexible so you can wrap them like octopus tentacles around any convenient location as shown in the snazzy marketing photo in Figure 1.
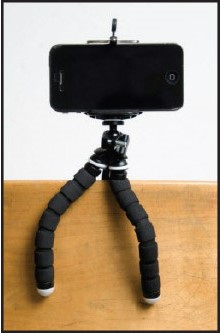
Figure 1. iStabilizer tripod, mount, and smartphone
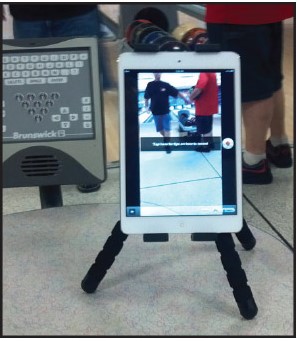
Figure 2. iStabilizer tablet mount and iPad
Tip: Make sure when purchasing a mount that it will fit your device properly. Many people have found that having one mount for a tablet and a smaller mount for a smartphone worked best for them.
Now we are ready to record some video and see ourselves in action!
iPad / iPhone video applications
There are two iOS applications that are immensely popular for capturing and analyzing sports video. They are Ubersense and SloPro. They are both free at the iOS App Store.
Ubersense
You can find documentation and video tutorials on the Ubersense app at www.ubersense.com. They are extremely well done and helpful if you are new to creating sports videos:
Below are the key features of Ubersense.
- Multiple sports are supported
- Multiple athletes are supported
- Videos can be saved by athlete and technique
- Coaches can record reviews of video
- Annotations like lines, circles, angles, free-hand drawing are available
- Playback at different rates
- Thumbwheel allows frame by frame movement through video
- Side by side analysis of videos
- Videos saved over time can be kept in timelines for easier comparisons
- Available for iOS (Android version in progress)
To get started, install the Ubersense app from the app store as you would any other application. Once installed you will be able to immediately begin recording your video. The initial screen shown in figure 3 allows you easy access to videos, help, and recording new videos.

Figure 3. Ubersense initial screen
From here you can choose to record a new video, play or analyze an existing video, get help, or modify your settings.
Tip: You can share videos with your coach and/or friends by signing up for a free account at www.ubersense.com. You can upload videos and designate who will be able to see them.
Here is a summary of the procedure for creating a new Ubersense video:
- Click on the Record button on the initial screen to go to the Recording screen.
- On the Recording screen, click on the Record button to begin recording. It will flash to remind you it is recording.
- When completed, click on the Record button again to finish recording video.
- The Tag Video screen will be displayed.
- This will allow you to assign the sport, athlete, and technique for the video so it can be grouped with other similar videos.
Tip: Videos organized by athlete and technique make it easier to use a more advanced feature like comparing two videos side by side.
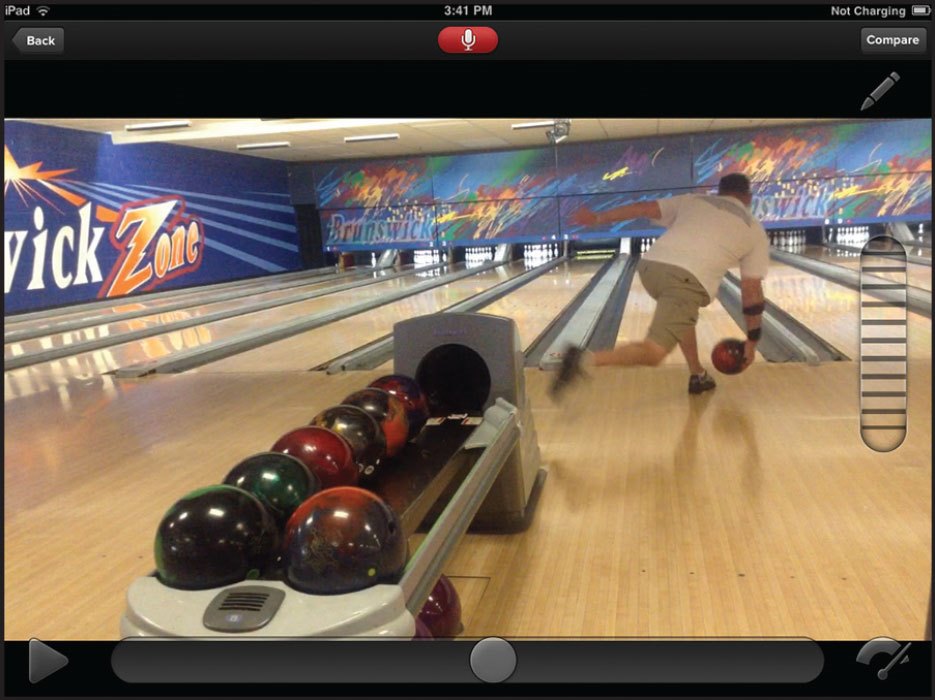
Figure 4. Ubersense Video playback screen
Figure 4 shows a video loaded on the playback screen. Once you have a video selected, you can begin playback through the various controls, add annotations by clicking on the pencil icon, or record a coaching analysis by clicking on the red microphone icon at the top of the screen.
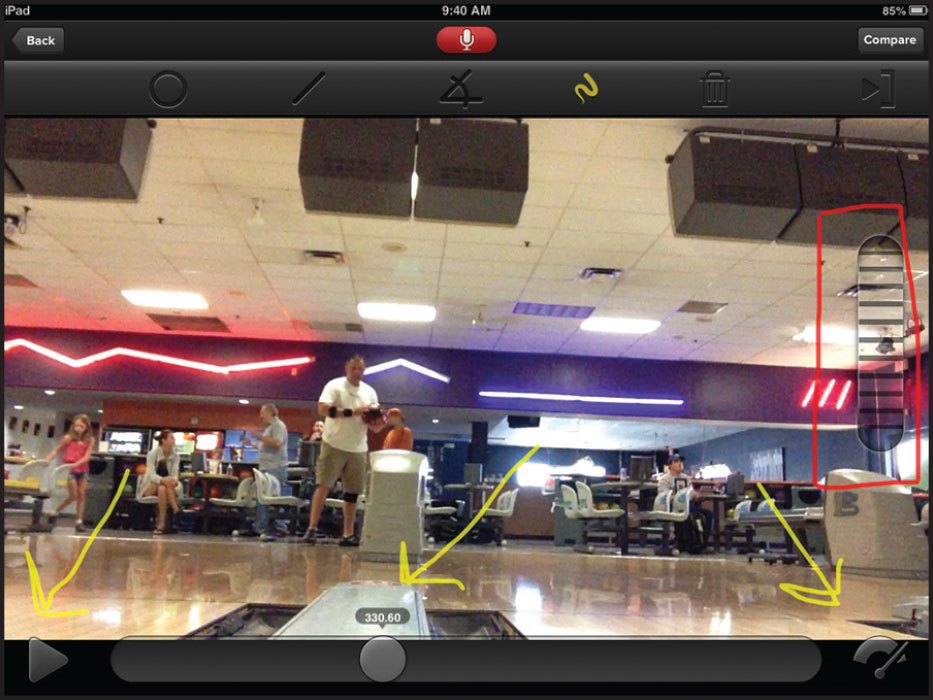
Figure 5. Frame by frame thumbwheel highlighted in hand-drawn red box. Yellow arrows show video playback controls
Use the thumbwheel to go back and forth frame by frame through the video. While the video may look strange to you at first, it is one of the most used features.
Tip: Annotations can be deleted individually or cleared all at once using the simple editing interface.
The button on the left is play/pause. The circle in the middle is the progress indicator. The indicator on the right allows you to adjust the playback speed from 1/8 to full speed.
Tip: You can also import video from an external source like a camcorder or the internet.
Ubersense allows you to load two videos at a time and use the playback controls to compare them. You can use the angle measurements and other annotations to examine changes. By saving videos over time, you can see what has changed.
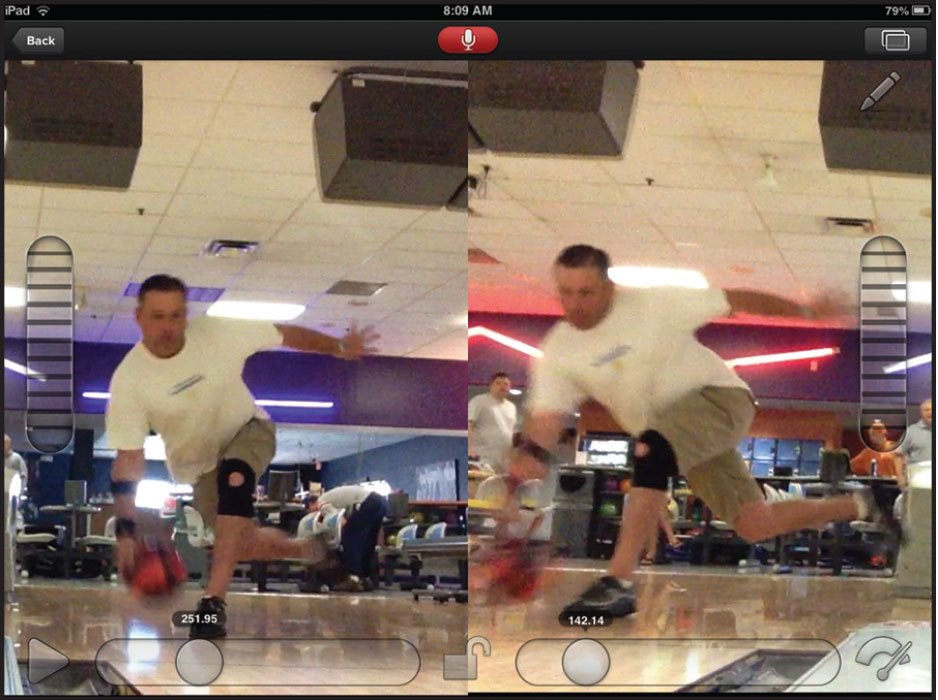
Figure 6. Comparing two videos in Ubersense
Tip: Be sure to video yourself when you are bowling well. That way, when you are not bowling so well, you can compare to see what looks different.
Tip: Make separate recordings if you have multiple bowlers! If you mix them together, then you will have to use external applications to edit the video. I did this on several videos and ended up exporting the video to a desktop, running videmux and splitting up the original video into individual shots by bowler and then combining those into separate videos, one per bowler. It would have saved time and a lot of effort to record each bowler separately.
SloPro
Video playback application:
- For iOS only; there are separate versions for the iPhone and iPad
- Designed with high-speed cameras up to 1000 frames per second in mind
- Shoot, edit, and share videos in beautiful slow motion
- Fast renderless editing
- In-app tutorials for advanced features
- Hardware-accelerated rendering using GPU
To get started, install the SloPro app from the app store as you would any other application. Tutorials and advanced help are available at www.sloproapp.com. SloPro focuses on providing clear slow motion playback using advanced techniques to get rid of blur. The initial SloPro screen lets you select or import a video for playback.
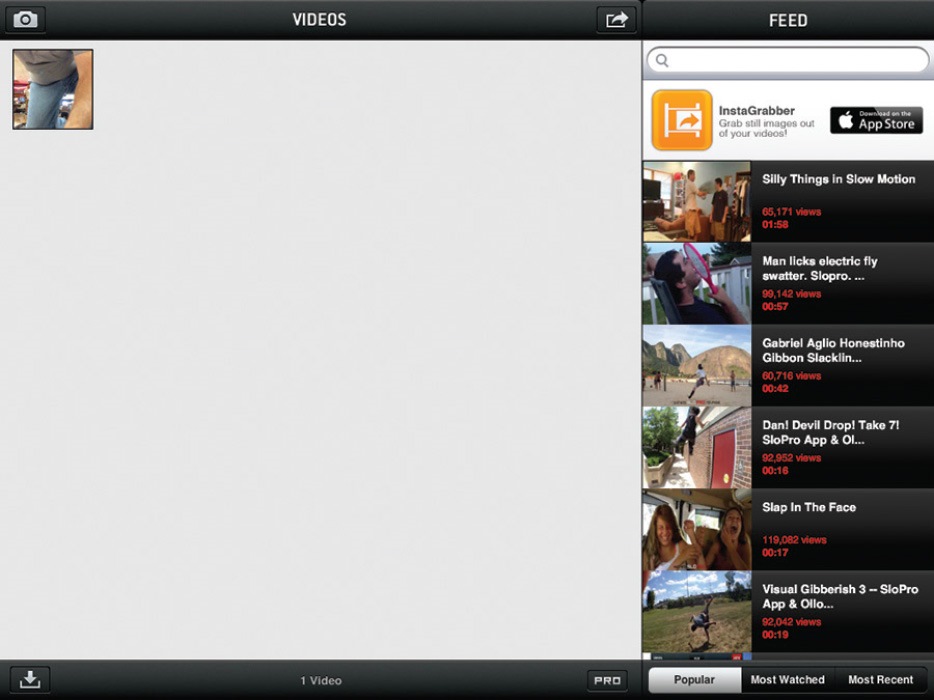
Figure 7. SloPro initial video screen

Figure 8. SloPro video playback screen
At the top of the SloPro video playback screen, you will see controls in the center that let you change the playback speed. There are choices for 50 percent, 40 percent and 25 percent of full speed, as well as choices for 1.2x, 2x, and 4x speeds. There is also a SUPER-SLOW option at 500 frames per second or 1000 frames per second. While this sounds fast, what it means is that playback will occur assuming the video was recorded at 500 or 1000 frames per second. Normal video is 24 frames per second, so this results in extremely slow, but smooth playback rates.
Tip: Turn down the sound when doing extremely slow or extremely fast playbacks; otherwise, the audio can be distracting….interesting, but distracting
If you choose a SUPER-SLOW option, it is recommended you also select a rendering method to improve the playback quality. There are three to choose from. See the documentation for details on the strengths and weaknesses of the different methods. Unfortunately, static pictures here will not demonstrate their pluses and minuses. Be aware that choosing a SUPER-SLOW option and a rendering method will cause the input video to be reprocessed. The longer your video, the longer this processing will take. Your patience will be rewarded, however, because the resulting video will be much sharper.
Android video applications
There are lots of video playback apps for Android but few video recording apps. One application for sports video analysis suitable for bowling is called Coach’s Eye and costs $4.99 on the Google Play store.
Coach’s Eye is also available for iPhone and iPad for $4.99 from the iOS App Store. The screenshots on this page are from an Android device. The iOS version is nearly identical.
Coach’s Eye
The video and screenshots for Coach’s Eye were created using a Samsung Galaxy Tab 10.1 tablet.
The Coach’s Eye video selection screen allows you to import a video from an external source, select an existing video or begin recording a new video.
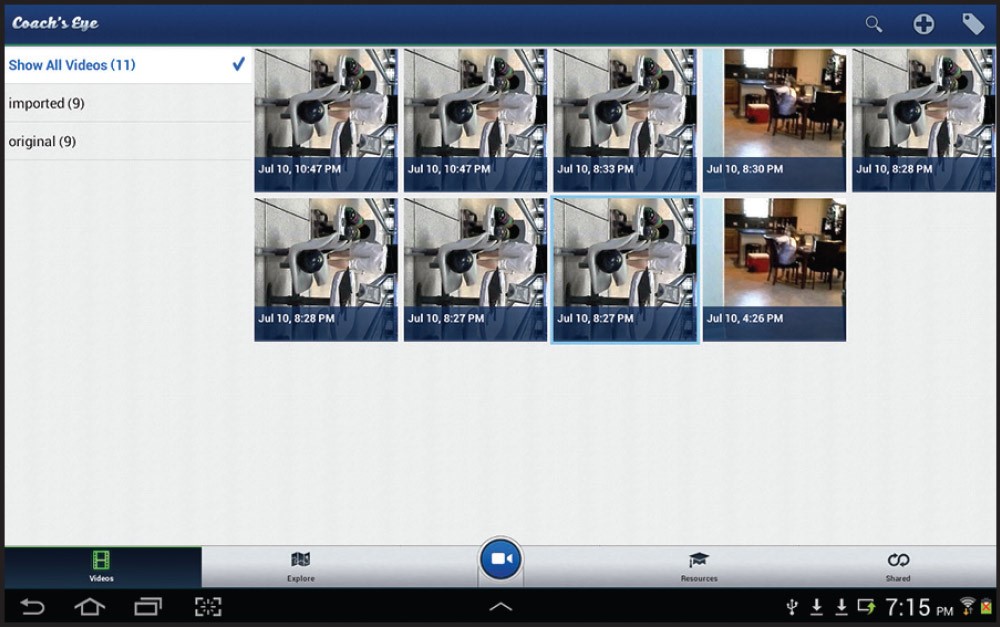
Figure 9. Coach’s Eye video selection screen
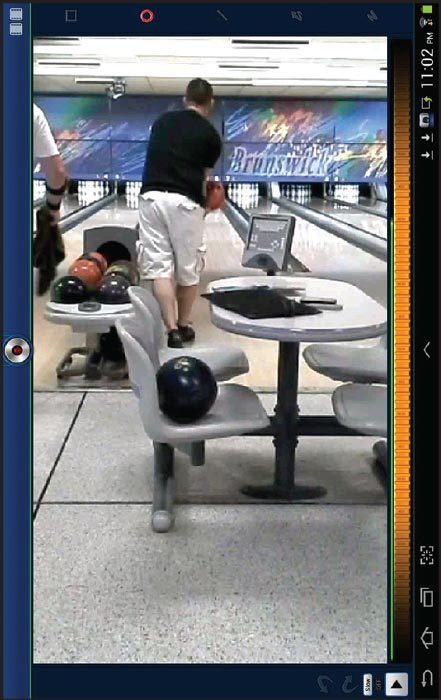
Figure 10. Coach’s Eye video playback screen
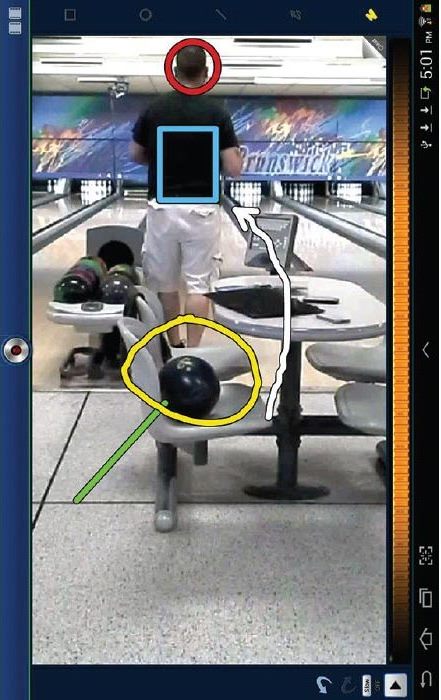
Figure 11. Coach’s Eye annotations during video playback
The Coach’s Eye video playback screen has a thumbwheel for frame by frame movement through the video. The playback screen also has play/pause button in the corner and active annotation buttons across the top. There is also a record button on this page so you can record the playback, annotations, and any audio for a coach’s analysis session.
Using the annotation buttons at the top of the Coach’s Eye playback screen, circles, rectangles, lines, arrows, and free-hand shapes can be drawn.
Tip: Coach’s Eye can only import videos less than 10 minutes long.
Summary
iPhone and iPad only apps Ubersense and SloPro both provide outstanding video recording, playback, and analysis features. If you are just getting started, try Ubersense first as its interface is more intuitive. However, SloPro has impressive features that make slow motion video easier to see and it’s definitely worth adding to your device as well. Since both are free, there’s little downside to trying them.
Video recording and editing options are more limited for Android devices. Coach’s Eye for Android tablets at $4.99 does a respectable job of providing video capture, playback, and analysis. Coach’s Eye is also available for iPhone and iPad for $4.99 on the iOS App Store and is another viable option for those with iOS devices.
So, along with using your mobile devices to play games or stay connected with family and friends, you know that you can record and analyze video to help improve your bowling game. Enjoy!
In the next technology article, the focus will be on apps that help with frame by frame scoring and gathering statistics on spare percentages, strike percentages, averages, starting position, ball specific results, etc.