
 (Only
(Only 
Article Contents
- 1. The geometry of stance and target adjustments
- 2. The 3-6-9 spare system
- 3. The 2-4-6 spare system
- 4. General spare shooting tactics
- 4.1. Throw your spare shots straight(er)
- 4.2. Find your lines to hit the 10 pin and the 7 pin
- 4.3. Move as needed from your center-of-10-pin and center-of-7-pin lines to convert spares
- 4.4. Be reasonable!
- 4.5. Speaking of practice…
- 5. Closing thoughts
Note: This article is only available to Bowling This Month subscribers.
Let’s start with a huge generalization: most of us could probably stand to improve our spare games. We know that spare shooting is important, we know we should consistently practice our spares, and we know that certain spare shooting techniques are widely accepted as more effective than others. We’ve read all the articles, we’ve watched all the videos, and we’ve been coached on the right ways and wrong ways to approach spare shooting. Yet—somehow, someway—many of us still just aren’t very good at making spares! Or, to put it slightly more nicely, most of us still have a lot of room left to improve.
Professional bowlers, as a group, are the world’s best spare shooters. I hope we can agree on this point. Yes, I know: you’ve seen professionals miss single-pin spares on TV. This does happen sometimes, but we shouldn’t be all that surprised: even in a completely ideal, pressure-free setting, the best spare shooter in the world will still sometimes miss. Add in the distractions of a live audience, TV cameras and lights, and the pressure of winning, and it should be easy to understand why spare mishaps sometimes occur on bowling’s biggest stage. The bottom line, though, is that you just don’t make it to the professional level in bowling without having a solid spare game, and you certainly don’t make it to the TV finals of a PBA event without making A LOT of spares throughout the event. Professional bowlers—especially the ones who win consistently—are the world’s best spare shooters.
It’s only logical then that—if you want to improve your own spare shooting—you might look to the pros for inspiration. After all, they’re the best…who better to look to for help? While this might seem like a great idea at first glance, you’ll quickly see many of the top pros using techniques and strategies that could be well outside of your comfort zone. I’m talking specifically about things like:
- extreme cross-lane 10 pin spare conversions across the sixth arrow;
- left-side spare conversions down the sixth or seventh arrow;
- 25 to 30 mph ball speeds on spare attempts;
- the use of urethane balls—and sometimes even reactive resin balls—for spares that are traditionally converted with plastic balls; and
- perfectly straight, 0 degree axis rotation angle spare shot releases.
Should we all rush out and start using these exact techniques in our own spare games? In some cases, maybe we should. But, for the vast majority of us, I’d argue that we probably shouldn’t blindly follow the lead of the pros. I’ll explain my reasoning a bit later in this article. But first, I’d like to start by covering some spare shooting fundamentals. From there, I’ll detail some sensible strategies that you can easily incorporate into your game to improve your spare shooting and get you headed down the right track. As we’ll discuss throughout this article, some of the strategies used by the very highly-skilled pros might be great for your game, but some of them might not be.
This article isn’t about some new rigidly-defined spare shooting system that I just made up that will instantly add 20 pins to your average. It isn’t about gimmicks, tricks, or anything of the sort! The world has not yet seen a perfect spare shooter, and reading this article won’t make you the first. But, I do hope it inspire you to understand the fundamentals of spare shooting, to develop a system that works for you, and to start putting in the work to constantly improve. Those seem like fairly reasonable goals, so let’s get started!
The geometry of stance and target adjustments
I’d like to start with a simple question: if a bowler who targets the arrows makes a 1 board adjustment with his feet in the stance, how much does that change the position of the bowler’s ball at the pins?
If you pick up many of the well-known, highly-respected bowling reference texts, you’ll find an answer: 3 boards. Why 3 boards? Well, the logic goes something like this: it’s about 60 feet from the foul line to the pins, and the arrows are about 15 feet from the foul line. A 1 board adjustment with our feet provides 1 board of left-to-right “angle” for every 15 feet of lane. Since we know our ball will be on the same board at the 15-foot mark (at our target, which is unchanged), that leaves 45 feet for the ball to travel 1 board in the side-to-side direction for each remaining 15 feet of lane: at 30 feet the ball will be shifted by 1 board, at 45 feet the ball will be shifted by 2 boards, and at 60 feet the ball will be shifted by 3 boards.
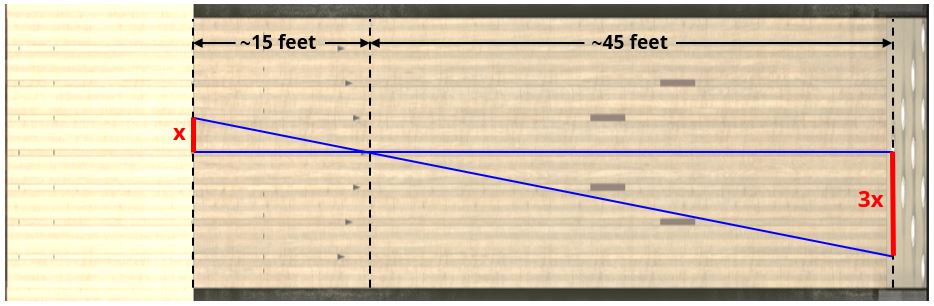
Conventional bowling wisdom states that a 1 board stance adjustment will create a 3 board shift in the position of the ball at the pins.
That all sounds great and logical at first glance. But, unfortunately, it’s completely wrong almost 100% of the time. I’ll explain why very shortly, but first let’s consider another simple question: if a bowler who targets the arrows makes a 1 board target adjustment, how much does that change the position of the bowler’s ball at the pins?
The common answer to this question is 4 boards. Again, the logic is similar: a 1 board target shift creates 1 board of left-to-right “angle” across the first 15 feet of lane. Therefore, extending this angle out to the rest of the lane ,the ball will be shifted by 1 board at 15 feet, 2 boards at 30 feet, 3 boards at 45 feet, and 4 boards at 60 feet.
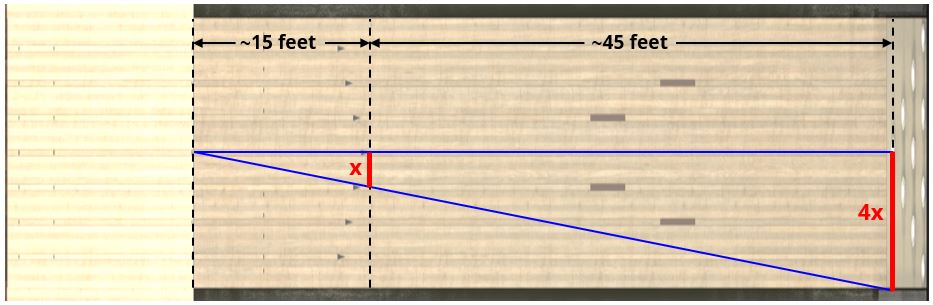
Similarly, it is often said that a 1 board target adjustment creates a 4 board shift in the position of the ball at the pins.
That again sounds great, but—once again—it’s completely wrong. The problem in both cases here is that we’ve not taken into account the distance we travel during the approach itself. For almost all of us, our stance is not at the foul line. More commonly, we assume a stance somewhere in the vicinity of 15 feet from the foul line—give or take a few feet, of course, depending upon the bowler’s style. When we move our feet 1 board in the stance, we actually create 1 board of left-to-right “angle” across a distance from the stance position to the target, NOT from the foul line to the target. If we assume an approach length of 15 feet (to keep the numbers simple), then a 1 board stance adjustment creates 1 board of lateral position change across 30 feet of distance (the distance from the stance to the foul line plus the distance from the foul line to the target).
Putting this into a simple example, let’s consider a bowler who is lined up to throw a perfectly-straight shot right up the 20 board. If this bowler moves to the inside by 5 boards in the stance, this will put the ball on the 22.5 board at the foul line, the 20 board at the arrows, the 17.5 board at 30 feet, the 15 board at 45 feet, and the 12.5 board at 60 feet, which is a 7.5 board offset from the baseline alignment. Therefore, as I hope this example clearly ...
Already a premium member? Click here to log in.